Sylius
Cloudimage Sylius Plugin
The Cloudimage Sylius Plugin will automatically adapt the image URLs in your Sylius site to deliver your images rocket fast over the Cloudimage multi-CDN infrastructure. You only need to register with Cloudimage and install the plugin in your Sylius Admin.
Installation
Prerequisites
To use the plugin, you need to have a Cloudimage account. You can create one on the Cloudimage registration page.

Step 1. Install and setup the plugin
Open a command console on your Sylius hosting server, enter your project directory and execute the following command to download the latest stable version of this bundle:
Then, enable the plugin by adding it to the list of registered plugins/bundles in config/bundles.php file of your project
Update Channel Model Your Entity Channel has to implement \Scaleflex\SyliusCloudimagePlugin\Model\ExtendedChannelInterface
You can use Trait \Scaleflex\SyliusCloudimagePlugin\Model\ExtendedChannelTrait
Update Database Schema
Include
in your templates/bundles/SyliusAdminBundle\Channel_form.html.twig form.
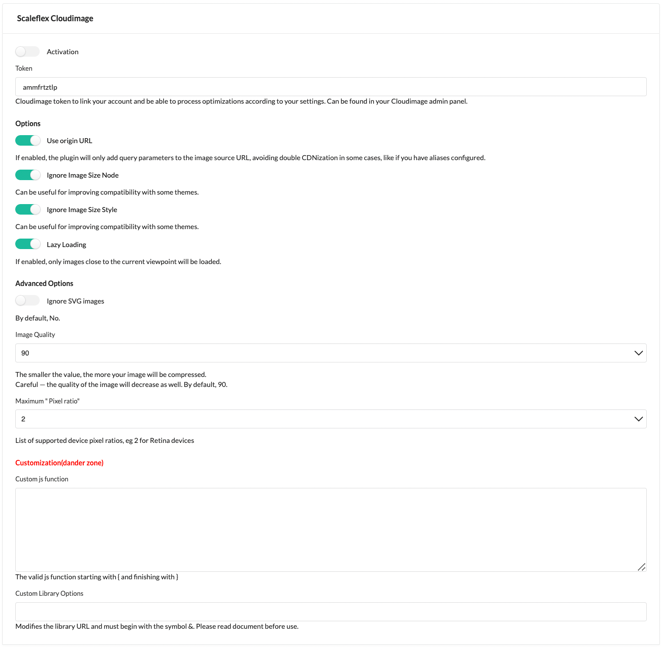
Then you can start to personalize the configuration (token, options) in Admin / Channel -> Choose one Channel

Add script to Shop by Event
Development
To process your image through Cloudimage you have two ways to implement
Option 1: Use the
ci_src(path)Twig Function
Option 2: Define your own
Update the image
srctoci-src="{path}?q={sylius.channel.cloudimageImageQuality}"Add the script
Step 2. Configure the module
Here are the available configuration options:
Activation
Enable/Disable the plugin
Token
Token from Cloudimage (found in your admin panel)
Use origin URL
If enabled, the module will only add query parameters to the image source URL without prefixing it with {token}.cloudimg.io : might be useful to avoid double CDNization, for exemple if you have aliases configured
Ignore Image Size Node
Useful for improving compatibility with some themes.
Ignore Image Size Style
Useful for improving compatibility with some themes.
Lazy Loading
If enabled, images will be lazy-loaded for better initial loading times and user experience. ⚠️ lazy loading can have variable results on some websites as for the first rows of images loaded, therefore it is recommended to make use of an integrated new class provided: “lazy-off”. You can specify the "lazy-off" class either in the page builder through the back-office, or in the templates directly (eg. category page and product page).
Custom js function
🚨 Any js function to customize the behavior of the Cloudimage library. Attention, adding js should only be done by advanced administrators as it can break the js or have unintended effects if not thoroughly tested and validated.
Image Quality
Customizes image quality, therefore compression -influences the size of image-.applied by default. Warning, a setting under 80 might have a potentially visible impact.
Ignore SVG images
If enabled, all SVG images will be skipped from acceleration as anyway vector images will not be compressed.
Maximum "Pixel ratio"
List of supported device pixel ratios, default is 2, eg: 2 for Retina devices
Custom Library Options
🚨 Those optional parameters will be added to the request for each URL going through the Cloudimage acceleration infrastructure. It can allow you to force image formats, apply automatic transformations or watermarking, and might be used for troubleshooting purposes. For advanced users only, please refer to the Cloudimage documentation here for the list of possible parameters.
When Javascript Mode is active, make sure that no other module is overwriting the plugin's delivery with "ci-src" image source.